Labels

Monday, September 30, 2013

Habitat for Humanity and Painting!

 Happy Monday, everyone!  Can you believe that tomorrow is October FIRST?!  I can't believe it's here already!
  This weekend was a packed! Friday was a family gathering where I got to meet more of Hubby's wonderful family, and the first night of our small community group with church.  Saturday was HFH, and home remodels; and Sunday was the Tulsa State Fair!  I think we gained about 10 pounds.
    Saturday, despite the torrential downpour was a productive day.  Saturday morning I was blessed t o be able to be a part of a Habitat for Humanity project with my church.  It was to be a 5 bedroom house for a deserving family with 7 children.  It was also time that I got to spend with my Dad.  The goal for that day was erecting all of the walls.  The outer wall frames were already built.  We just had to go through and hammer on the plywood and cut out the windows.  Next came raising the walls!  It sure was amazing to see the difference and to be part of a great project.  I can now say I have built and raised house walls.  We were going to begin on all of the interior walls but that's when the downpour hit and the work had to be temporarily suspended.


{This is before the walls were built. And below is a picture of the walls ready and waiting to be raised.}


My next project of Saturday was long overdue.  The only walls in our house that have remained white are the two bathrooms and the hallway outside our bedroom and guest bedroom.  I've been wanting to find the perfect color to paint the guest bath.  I started the room make over by painting the sink base and cabinets a glossy black. (This is the sink that I mentioned in my previous post on which I used the same glossy black lacquer.)  I also painted the antique mirror to match.  Eventually, we want to cover the laminate flooring with faux wood vinyl, like in the kitchen.  I will also have to later include a picture of the sink once it was painted.


I have Better Homes and Garden to thank for the paint inspiration.  There was a coupon for a free 8oz sample of a Fall color of Valspar paint.  Since the Lowe's we went to had not yet received their Fall supply of colors, we got to choose any color we wanted!  We chose Valspar's Caramel Cream.  Those 8ozs were enough to put two coats on one wall section of our guest bathroom.  Woo-hoo!!  I felt pretty accomplished.  Of course, there's still more to be done.  We want to paint just one side of the bathroom and leave the other side white so it's not as overwhelming.  More pictures to come soon!


Friday, September 27, 2013

What's in My Purse

It's time for a "what's in my purse" post.  Granted, I edited it slightly.  Y'all don't want to see my old receipts, folded up recipes or gum trash.  So, without further ado, here are the contents of my purse, all nicely labeled.  This picture actually makes my purse look pretty organized...I kinda like it!


1. My lady bag.  Filled with shark week items and various lipsticks and hand sanitizer.
2. Sunglasses.  I got this pair at Ride the Ducks while on our honeymoon in Branson.  They finally gave out just last week.  :(
3. Various pens and a pencil.  No choir person goes around without a pencil in their purse.  Just me?
4. With my terrible allergies, a pack of tissue is a must!
5. Glasses case.  I finally have a pair of scratch free, nice glasses.  I plan on keeping them that way!
6. My wallet.  I might have overstuffed it a little... I also got this while on our honeymoon.  I got it at Dick's     .5 and .10 store.  Always a fond memory going in there!
7. A notebook to take notes in church and to jot down my random ideas.  Bought for me by Mama.
8. A card with the location of our new Community Group with Church on the Move.
9. A Victoria's Secret coupon!!
10. Taurus 38 handgun.  I'm pretty proud of it.  I recently got my open carry license and shortly after that, for my birthday Hubby got me this cute but accurate .38!  A girl's gotta be protected.
11. Assorted lipglosses and lipstick.
12. Paint samples.  I think this is the color I want to paint one of our guest bathroom's walls as an accent wall.
13. And last, but not least, a roll of mints.  Having a big customer service job, it's important to keep your breath refreshed and pleasant.


HAPPY FRIDAY!!!

Thursday, September 26, 2013

DIY High Gloss Table

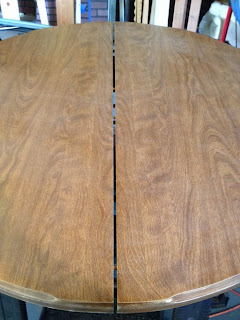
 I love finding good deals!  Who doesn't?  Sister recently moved into an apartment, and so began the hunt for furniture and things with which to beautify it.  It's like having a second house to decorate!  If you couldn't tell already, I love to decorate.  L.O.V.E.  I also love finding things that are good but cheap, like this wooden dining room table and chairs.  Found it on Craigslist.  Now, are you ready to hear how much it was?  Nah...I don't think you are.  One more time.  Are you ready to hear how much it was?!  That's better.  $20!  That's right folks.  This fun wooden table and chairs was just $20!!!  And, we already had the sandpaper, already had the paint, and already had the brushes.  Bam!  I was pretty proud of this table's turnaround.


First part of the prep work is sanding the surface.  Yes, it was a wooden table, but the surface of it was covered in that fake wood grain shiny synthetic stuff.  And yes, that's the 'official' name of it.  I used a couple of different grit sandpapers.  First I used 60 grit, which is a coarser grit to really texturize the surface to give the paint something to adhere to.  If the surface is too slick, then the paint could easily chip off.  Then, to smooth it out a little so the surface wasn't too gritty I went back over everything with a 120 grit.  I then wiped over everything to make sure I had a perfectly clean surface with no leftover dust that could prevent the paint from adhering.


I wanted a high gloss paint.  So high of a gloss that I could see my reflection in it!  This was the perfect paint.  It was actually pretty much enamel.  Oil-based, Professional High Performance Protective Enamel by Rust-Oleum. (You can find it here.) This stuff did the job.  Best thing is, it's cheap and this little can goes a looong way.  We also used this same little can to paint the sink cabinet in our guest bathroom.  After this table project, there was still a little less than half a can left.  It goes on thick so it only needs one coat.


Look at the crazy difference!  I was in love with it already.  Too bad it wasn't staying at our house.  Buuut we have our dining room table (which is currently orange) that could technically be repainted.  Hmmm.....


Make sure to paint the legs.  This is where my hands got the messiest!  In hindsight, I would suggest  wearing gloves to paint the legs, unless you have a better method than I did.  This paint got all over me when I got down to the other end of this and only had the screw to hold onto.  This paint doesn't come off of skin easily.  It will take paint thinner, and not just mere water and soap.  So be warned.
 
    I finished it off by putting a clear polyurethane coating. (Found here.)  I accidentally used semi-gloss, when what I really wanted was high gloss, but it still turned out really glossy.


Of course, I had to test how the chairs were going to look with it.  Everyone was skeptical about having brown chairs with a black table.  They didn't believe me that it would look so good.  It's that age old fashion faux-paux "brown doesn't go with black..."  Well this does!  Everyone was sucking back their words when they saw the finished product.  "Trust me," I say.  "We have a hard time picturing it," they say. "Well look at it now," I say.  "Ooh!  It does look good," they say!


Wednesday, September 25, 2013

The Green Barn

Last weekend my husband and I went to a place called 'The Green Barn Shop.'  It is a scavengers paradise!  There is stuff in any direction you look and it goes on and on.  We found some great stuff.  And the owner has really good prices.  I actually didn't get to see everything.  There are several little sheds and trailers to go through, along with an unlit barn.  Hubby and I had to use flashlights to go through it.  I got freaked out by finding a spider and couldn't continue on.  But there looked to be some great stuff hidden in the shadows! We will have to go back.  There was so much more to see and they get new stuff in every day!  We spent probably an hour or more there.  It's located in Sand Springs, behind the Wal-Mart off of Highway 97.  It was quite an experience.  Be sure when you go to wear long pants and sturdy walking shoes.  No open toed sandals.  There's stuff you have to walk on and weeds to walk through to get to all of the locations.


{All of this, plus 10 mason glass jars with handles, and a mid sized window for only $25!}

                                           {Great yardsale find the same day.  $0.25 a piece!}

{One of my Green Barn purchases.  I bought some flowers to put in it and gave it to Sister to put on her new dining room table, which I will be making a post about later t his week or this weekend!}

Tuesday, September 24, 2013

Old-Fashioned Spice Cake and Cream Cheese Frosting

And now continues my barrage of all things Fall.  When Hubby and I were in St. Louis last month, we picked up and Old-Fashioned Pumpkin Recipes book.  It goes through the process of how to prepare fresh pumpkin pulp and contains many delicious recipes!  I selected the recipe entitled Hallowe'en Cupcakes.  If you're one of those peekers and read ahead, then you can see that I only made half a batch of cupcakes and the rest into little bundt cakes using one of our wedding gifts from Grandma.  The recipe is super easy and straight forward.  Ok, actually one part was confusing to me.  The ingredients don't list butter, and yet the first direction is to cream together  the butter and sugar.  The first ingredient on the list is vegetable oil, so I just interpreted that as them meaning to say vegetable oil spread, like the Country Crock I have pictured.  The recipe still turned out deliciously!


Ingredients
1/2 cup vegetable oil (vegetable oil spread)                            
 1/2 tsp ground cinnamon
1 1/2 cups brown sugar                                                          
 1/2 tsp ginger
2 eggs, beaten (I forgot to beat mine!  But I'm sure they thanked me for sparing them...)
1/2 tsp ground cloves
2 cups all-purpose flour
Dash nutmeg (I just shook my little nutmeg container a couple of times and called it good.)
1/2 tsp salt
1 cup whole milk (I used 2%)
1 1/2 tsp baking soda

Spice Cake
1. Preheat oven to 375 deg F.
2. Put on some good music- I love my Pandora station for the Civil Wars.  Great band.
3. Cream vegetable oil spread and sugar in mixer. (It will look like the consistency of wet sand.)
4. Beat in eggs.
5. In a separate bowl, combine dry ingredients and stir into first mix alternately with milk. (I actually poured the milk in first on accident then slowly poured the dry ingredients.  You'll want to add the dry ingredients a little at a time if you're using a mixer.  It tends to kick up dust if you put too much in at once.
6. Place paper muffin cups in muffin tins, (or spray the little bundt cups with a non-stick pray,) and fill each cup 2/3 full.  Bake for 20 minutes.

Cream Cheese Frosting
Ingredients:
3 oz cream cheese
3 oz butter (again, I used the vegetable oil spread...)
2 tsp vanilla
Powdered Confectioners Sugar (Enough to achieve desired consistency)
Milk (enough to thin out if need be)

1. In an a stand or hand mixer, mix together butter, cream cheese and vanilla.
2. Slowly incorporate powdered sugar.
3. Mix in milk a tsp at a time until the desired consistency is achieved.  I wanted mine to be more like a glaze, so I played around with how much powdered sugar and milk I added until I had it thin enough to drizzle over the bundt cakes. (Hubby loved the frosting!  It was his idea to make it cream cheese.  I was just going to make a simple powdered sugar, vanilla and milk glaze.  Good choice, Hubby!)

Monday, September 23, 2013

Breakin Out Fall Clothes

 So with Fall officially upon us, that means I get to break out the layers, scarves and boots indicative of Fall weather!  The mornings have been a crisp 61 degrees.  Perfect for cups of coffee with toasted bagels and pumpkin creamcheese.  (Which is a super simple recipe: I just started off with 4oz cream cheese then stirred in about two heaping spoonfuls of pumpkin filling, dashes of nutmeg, cloves, ginger, cinnamon and a little pumpkin pie spices.  Mix it all up and voila!)

  Today, I got to do some more job training for school, but instead of teaching 2-5 year olds, we started off teaching lap babies and preschoolers. Let me tell you, they are so precious.  I was the shiny new toy that they all wanted to sit next to.  Some of the teachers told me that the outfit I was wearing (pictured below,) looked like something straight off of Pinterest.  I took that as a big compliment!  I'm trying to start accessorizing more and fancying things up, hence the numerous bracelets I was wearing.  I'm trying combos out to see what works and what doesn't.  It's been a fun process!


And Happy Fall, Y'all!!!

Thursday, September 19, 2013

For These Things, I am Thankful

 It's time for a thankful post.  God has been so good to us.  A lot has happened in the past couple of years.  Big life changes.  Graduating from college, getting married to the love of my life, adopting a puppy, starting a new job... And through all of this, God has been faithful to provide, encourage and support. As have my Hubby and family.  I have compiled a list of things t hat I'm thankful for.  However, everything I'm thankful for is not confined to this list.  There's so, so much more.  I don't think I could even begin to list the number of things I'm thankful for.  The little things.  I'm thankful for sunrise and sunsets (even if I'm not up early enough to see the sunsets,) coffee, the diversity of people, flowers, smells, technology (sometimes..,) Fall, cool weather, different climates, the United States, freedom, good friends, and I could go on and on.  Here are a few of the big (and little) things:

 {I'm thankful for marrying the best, most handsomest man in the world.  My best friend.  He makes me so happy, takes care of me, is godly, caring, innovative, handy...and I could go on and on for him as well.}

{I am thankful for getting to spend time with Hubby. I love going out places with him{.  I love being in his presence.  I love talking to him.  I wish I could be around him more.  Like, all the time!}

{I'm thankful for our family.  This is us way back in the day.  Okay, not that back in the day.  This was probably taken when I was in middle school.  We had to walk past several prairies before we got to the two room school house.  And in the snow!  Actually...this was one of those pictures taken at Silver Dollar City I believe.  Haha.  Makes for a good story though!}

{My family is great.  They's fun, supportive, loving, giving... Love you guys!}


{I'm thankful for our puppy! Bandit. He's so spoiled.  We adopted him from the ASPCA.  Next week will mark one year that we've had him.  He has been such a joy in our lives.  He's exuberant when we come home, sad when we leave, excited to do things with us.  He's silly, he's precious, he's one of a kind!}

{I'm thankful for the miracle of a tree or plant springing out of a little seed, a big seed, anything coming out of a little ball that looks like a clump of dirt.  This is the avocado tree I'm growing.  I'll have to put a tutorial up later about how to grow a tree from the pit. It's pretty neat actually.  It seems to take forever.  But it's worth the wait.  It has even more leaves on it now that in does in the last picture in the series.}

What are you all thankful for?


Wednesday, September 18, 2013

PSL Syrup DIY

Fall is in the air.  We've had such great weather this past week.  I've been able to wear scarves two days this week!  I want to celebrate this cool weather by sharing a delicious make at home PSL recipe!  It tastes just like Starbucks', though not as strong.  But that's okay by me.  I always thought Starbucks' coffee was a little strong anyway.  But this recipe is sure to please the die hards and the PSL newbies.  It contains all the usual suspects: clove, cinnamon, ginger, nutmeg, and pumpkin.  I'll let y'all decide how close it comes to the real deal.  In my opinion, it tastes better.  Plus it's a fraction of the cost!  It just takes about 10 minutes to make if you're good at multitasking.  I had the coffee brewing while the syrup mixture heated up.  When the mixture was almost done, I started heating up the milk for the 'latte'.                                                                                                               

Ingredients
2 cups water
1 1/2 cups sugar (I only used 1/2 cup of Splenda and it still turned out perfectly!)
1/2 cup packed brown sugar
1 tsp ground cinnamon
1/2 tsp ground nutmeg
1/2 tsp ground ginger
1/4 tsp ground cloves
4 heaping tbsp pumpkin puree (My favorite part!)

Instructions
1.Combine all ingredients in pot.
2. Over medium heat, stir ingredients until sugar has fully dissolved.
3. Continue heating for 5-6 minutes, but do not let boil.
4. Remove from heat and pour through fine mesh strainer.
5. Inhale the delicious fall smells emanating from the steaming pot.
6. Store in airtight container(s).

Latte Instructions
Like me, if you don't have an espresso machine there's an easy way to make a latte-like drink.
1. Brew a strong strong pot of coffee.
2. While coffee is brewing, heat a pan of milk over the stove. Don't let it boil either or it could scorch.
3.  After the milk is heated through, take a small whisk and whisk it up to incorporate those little air bubbles.
4. Pour PSL syrup into cup of coffee, then the frothy milk. Ah...
5. Sit back and relax with your favorite book, absorbing the nice crisp mornings.


                                                Original PSL Syrup recipe can be found Here.

Tuesday, September 17, 2013

Pretty in Blue

Happy Tuesday!
    My mom, grandma, sister and I went on a shopping trip to Dallas several months ago as a Christmas gift from our parents.  One of the stores we stopped at, (a store whose name I can't quite recall at the moment) had this beautiful shirt in several different colors.  Grandma swooped this blue shirt off the rack and bought it.  Lo and behold, several months later within whose closet should it be found?  That's right, mine.  Grandma no longer wanted it so I got this shirt, along with another similar shirt but in denim.  Grandma had always been conscious and wary of some of my clothing choices when I was younger, (wearing a Halloween costume to school??) not ironing some clothes, having messy hair...just to name a few things.  But this option she approved of!


{A necklace given to me by Hubby after we'd been dating for a month.  He actually surprised me in Edmond (where I'd been living at the time,) and had put together a scavenger hunt for me around my house.  My friends and I had just returned from a friend's beautiful wedding shower.  What a sight it would have been to see 4 or 5 of us girls flocking around the house from spot to spot, looking for the next clue.  The hunt ended in one of my dresser drawers where nestled among my clothing was a little cream jewelry box.  He then showed up at the house!  And I'd wondered why my friend, Lizzle had been trying to herd us quickly from the wedding shower...}
{Twinkies! I just love accidental twinkie moments.  This brightened my morning when one of my fellow coworkers showed up at work in practically the same outfit!  Just goes to show how versatile one piece of clothing can be.}